
okhttp Timeout 超时设置与用法解释
1. 用法: 设置超时时间
OkHttpClient httpClient = new OkHttpClient.Builder()
                .retryOnConnectionFailure(true)
                .connectTimeout(CONNECT_TIMEOUT, TimeUnit.SECONDS) //连接超时
                .readTimeout(READ_TIMEOUT, TimeUnit.SECONDS) //读取超时
                .writeTimeout(WRITE_TIMEOUT, TimeUnit.SECONDS) //写超时
                .addInterceptor(new CommonHeaderInterceptor())
                .addInterceptor(new CacheInterceptor())
                .addInterceptor(new HttpLoggerInterceptor())
                .addNetworkInterceptor(new EncryptInterceptor())
                .build();
这个都知道, 一搜一大把, 但是没人讲这三种timeout有什么区别...
2. 总结
源码分析之前先上总结
- connectTimeout 最终设置给了socket (确切的说应该是rawSocket)
- readTimeout 最终设置给了rawSocket 以及 在socket基础上创建的BufferedSource
- writeTimeout 最终设置给了在socket基础上创建的BufferedSink
一言以蔽之: okhttp底层基于socket, 所以 Timeout 自然也是设置给Socket 的 connect / read / write。而socket是对于传输层的抽象, 因为我们这里讨论的是http, 所以对socket设置各种timeout 其实也就是对于TCP的timeout进行配置;
TCP协议(握手/挥手/发包/丢包重传/滑动窗口/拥塞控制等细节)以及socket属于前置知识, 若不太了解,建议先恶补一下。
以下的源码探究就是罗列记录一下自己的探究过程, 嫌啰嗦可以忽略~
3. 源码探究
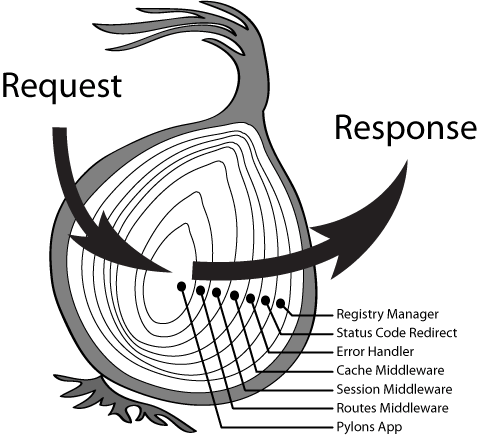
我们知道 okhttp 采用了责任链的设计模式,用一条抽象的 Chain 将一堆 Interceptor 串起来,从发出request 到接收response的路径类似于node.js中koa2的“洋葱模型”(图1),而 okhttp 的 Interceptor 作用就相当于koa2中的 middleware.
“洋葱”的每一层都是一个Interceptor,每一层都专注于自己的事情(单一职责),比如日志、mock api,弱网模拟,统一header,APP层缓存、通讯加密等,功能拆分,互不影响,从框架层面来讲也是对AOP思想的具体实践。(AOP可不仅仅是传统意义上的字节码插桩)

okhttp本身已经提供了几个Interceptor的默认实现,比如 CacheInterceptor 就是对于http1.1缓存机制的具体实现(cache-controll等); ConnectInterceptor 专门负责创建/复用TCP连接, 里面的ConnectionPool就是对http1.1 中 keep-alive(TCP连接复用)和 pipline机制(用多条TCP连接实现并发请求)的具体实现。而超时相关的设置也是从这里切入。
/** Opens a connection to the target server and proceeds to the next interceptor. */
public final class ConnectInterceptor implements Interceptor {
  public final OkHttpClient client;

  public ConnectInterceptor(OkHttpClient client) {
    this.client = client;
  }

  @Override public Response intercept(Chain chain) throws IOException {
    RealInterceptorChain realChain = (RealInterceptorChain) chain;
    Request request = realChain.request();
    StreamAllocation streamAllocation = realChain.streamAllocation();

    // We need the network to satisfy this request. Possibly for validating a conditional GET.
    boolean doExtensiveHealthChecks = !request.method().equals("GET");
    // 入口在 newStream 方法
    HttpCodec httpCodec = streamAllocation.newStream(client, chain, doExtensiveHealthChecks);

    RealConnection connection = streamAllocation.connection();
    return realChain.proceed(request, streamAllocation, httpCodec, connection);
  }
}
上面的 StreamAllocation#newStream 方法就做了两件事,
public HttpCodec newStream(OkHttpClient client, Interceptor.Chain chain, boolean doExtensiveHealthChecks) {
    // 这里的chain就是RealInterceptorChain,它里面的各种timeout值都是通过我们创建HttpClient时原封不动赋给它的,下面只是它的一些get方法;
    int connectTimeout = chain.connectTimeoutMillis();
    int readTimeout = chain.readTimeoutMillis();
    int writeTimeout = chain.writeTimeoutMillis();
    int pingIntervalMillis = client.pingIntervalMillis();
    boolean connectionRetryEnabled = client.retryOnConnectionFailure();
    //简化后的代码
    ...
      // 3.1  findHealthyConnection 会调用 findConnection
      RealConnection resultConnection = findHealthyConnection(connectTimeout, readTimeout,
          writeTimeout, pingIntervalMillis, connectionRetryEnabled, doExtensiveHealthChecks);
      // 3.2
      HttpCodec resultCodec = resultConnection.newCodec(client, chain, this);
      return resultCodec;
  }
3.1 设置给rawSocket 上的 connectTimeout 和 readTimeout
StreamAllocation#findConnection主要做了两件事,先是从连接池中复用或者创建一个新的连接(RealConnection),然后调用 RealConnection#connect 方法完成 TCP + TLS 握手,其中TCP握手是在
RealConnection#connectSocket(connectTimeout, readTimeout, call, eventListener); 中发起的。
 /**
  * Does all the work necessary to build a full HTTP or HTTPS connection on a raw socket.
  */
  private void connectSocket(int connectTimeout, int readTimeout, Call call,
      EventListener eventListener) throws IOException {
    Proxy proxy = route.proxy();
    Address address = route.address();

    //创建一个socket。 在未设置proxy的情况下, 会采用默认的proxySelector, 此时的proxy.type == DIRECT 即直连
    rawSocket = proxy.type() == Proxy.Type.DIRECT || proxy.type() == Proxy.Type.HTTP
        ? address.socketFactory().createSocket()   // 走这里, 实际new Socket()
        : new Socket(proxy);

    eventListener.connectStart(call, route.socketAddress(), proxy);

    //给socket设置读取server端数据的超时;
    rawSocket.setSoTimeout(readTimeout);

    try {
      //实际调用的是 rawSocket.connect(route.socketAddress(), connectTimeout), 建立TCP连接,同时设置连接超时
      Platform.get().connectSocket(rawSocket, route.socketAddress(), connectTimeout);
    } catch (ConnectException e) {
      ...
      throw ce;
    }

    // The following try/catch block is a pseudo hacky way to get around a crash on Android 7.0
    // More details:
    // https://github.com/square/okhttp/issues/3245
    // https://android-review.googlesource.com/#/c/271775/
    try {
    //创建source
      source = Okio.buffer(Okio.source(rawSocket));
    //创建sink
      sink = Okio.buffer(Okio.sink(rawSocket));
    } catch (NullPointerException npe) {
      ...
    }
  }
关于socket.setSoTimeout, 以下是原文档说明的个人翻译及理解
调用此方法设置一个非0的timeout,那么调用InputStream(与此Socket相关联的) 的read()这个阻塞方法读取server端的数据时, 持续timeout之久。
如果timeout 到期,不管Socket是否有效, 都会抛出java.net.SocketTimeoutException。
这个timeout 必须在socket进入block操作之前设置 才能生效;
正常设置timeout >0, 如果设置timeout=0, 则代表 timeout无限;
关于socket.connect(address, connectTimeout);
Connects this socket to the server with a specified timeout value. A timeout of zero is interpreted as an infinite timeout. The connection will then block until established or an error occurs.
简言之就是 与server建立连接的最大时长
3.2 BufferedSource上的 readTimeout 和 BufferedSink上的writeTimeout
RealConnection#newCodec() 根据 connection 创建httpCodec(Encodes HTTP requests and decodes HTTP responses.)
  public HttpCodec newCodec(OkHttpClient client, Interceptor.Chain chain, StreamAllocation streamAllocation) throws SocketException {
      //前面是HTTP2相关的实现,暂略
      ...
      //此处又给socket设置了一次readTimeout, 当然此socket已经不一定是rawSocket了
      socket.setSoTimeout(chain.readTimeoutMillis());
      //
      source.timeout().timeout(chain.readTimeoutMillis(), MILLISECONDS);
      //
      sink.timeout().timeout(chain.writeTimeoutMillis(), MILLISECONDS);

      return new Http1Codec(client, streamAllocation, source, sink);

  }
当然还有一个地方是在connectTunnel()用到, 但是这个前提是走http代理的时候, 这个暂且不详细探究;
3.3 下面是source和sink中的timeout 的详细解释
Source 和 Sink 是 okio 中定义的两个接口, 这两个接口都支持读写超时设置
其中source可以理解为inputstream, sink可以理解为outputstream

具体是什么鬼, 看一下source和sink的创建就是知道了
BufferedSource的创建
罗列细节之前先总结一下流程:
Socket ----> InputStream ---> Source ---> BufferedSource
还是RealConnection的connectSocket方法
//创建BufferedSource
source = Okio.buffer(Okio.source(rawSocket));
Okio.buffer(Source source)就是new RealBufferedSource(source);
那么下面主要来看Okio.source(rawSocket)
  public static Source source(Socket socket) throws IOException {
    if (socket == null) throw new IllegalArgumentException("socket == null");
    AsyncTimeout timeout = timeout(socket);
    //此处用socket的inputstream创建了source
    Source source = source(socket.getInputStream(), timeout);
    return timeout.source(source);
  }

//下面请看 okio 是如何将 inputstream 封装成 source 的
private static Source source(final InputStream in, final Timeout timeout) {
    if (in == null) throw new IllegalArgumentException("in == null");
    if (timeout == null) throw new IllegalArgumentException("timeout == null");

    return new Source() {
      @Override public long read(Buffer sink, long byteCount) throws IOException {
        if (byteCount < 0) throw new IllegalArgumentException("byteCount < 0: " + byteCount);
        if (byteCount == 0) return 0;
        try {

          //每次read都会检测timeout
          timeout.throwIfReached();
          Segment tail = sink.writableSegment(1);
          int maxToCopy = (int) Math.min(byteCount, Segment.SIZE - tail.limit);

          //本质还是调用了inputstream的read方法
          int bytesRead = in.read(tail.data, tail.limit, maxToCopy);
          if (bytesRead == -1) return -1;
          tail.limit += bytesRead;
          sink.size += bytesRead;
          return bytesRead;
        } catch (AssertionError e) {
          if (isAndroidGetsocknameError(e)) throw new IOException(e);
          throw e;
        }
      }

      @Override public void close() throws IOException {
        in.close();
      }

      @Override public Timeout timeout() {
        return timeout;
      }

      @Override public String toString() {
        return "source(" + in + ")";
      }
    };
  }
BufferedSink的创建
跟BuffedSource很相似, 简略描述
sink = Okio.buffer(Okio.sink(rawSocket));
同样主要看Okio.sink(rawSocket)的实现
public static Sink sink(Socket socket) throws IOException {
    if (socket == null) throw new IllegalArgumentException("socket == null");
    AsyncTimeout timeout = timeout(socket);
    //用socket的outputstream创建sink
    Sink sink = sink(socket.getOutputStream(), timeout);
    return timeout.sink(sink);
  }
sink静态方法的实现
private static Sink sink(final OutputStream out, final Timeout timeout) {
    if (out == null) throw new IllegalArgumentException("out == null");
    if (timeout == null) throw new IllegalArgumentException("timeout == null");

    return new Sink() {
      @Override public void write(Buffer source, long byteCount) throws IOException {
        checkOffsetAndCount(source.size, 0, byteCount);
        while (byteCount > 0) {

          //每次write之前检测timeout
          timeout.throwIfReached();
          Segment head = source.head;
          int toCopy = (int) Math.min(byteCount, head.limit - head.pos);

          //最终调用outputstream的write方法
          out.write(head.data, head.pos, toCopy);

          head.pos += toCopy;
          byteCount -= toCopy;
          source.size -= toCopy;

          if (head.pos == head.limit) {
            source.head = head.pop();
            SegmentPool.recycle(head);
          }
        }
      }

      @Override public void flush() throws IOException {
        out.flush();
      }

      @Override public void close() throws IOException {
        out.close();
      }

      @Override public Timeout timeout() {
        return timeout;
      }

      @Override public String toString() {
        return "sink(" + out + ")";
      }
    };
  }
以上~