
springfox 源码分析(三) 初探Spring Plugin插件系统
更多springfox 源码系列文章可关注我的博客,点击前往
时间:2019-5-22 12:46:50
地点:单位、家中
前言
同MapStuct组件一样,因为springfox中运用到了Spring Plugin插件系统,我们对研究springfox源码之前,先来学习一下Spring Plugin插件的机制
因为在工作中很少使用到Spring Plugin,所以学习记录下
Spring Plugin
Github:https://github.com/spring-projects/spring-plugin
可以说作为Spring项目中的Spring Plugin,确实相对小众,并没有像Spring其他的项目那么流行,甚至在其他流行的框架中,都很少见到他的身影.
截止目前(2019-5-22 13:54:08),Github 的Star为222,fork数66
Spring Plugin是世界上最小规模的插件系统
如今构建可扩展的体系结构是创建可维护应用程序的核心原则。 这就是像OSGi这样的完全成熟的插件环境如今如此受欢迎的原因。 不幸的是,OSGi的引入给项目带来了很多复杂性。
Spring Plugin通过提供扩展核心系统功能的插件实现的核心灵活性,但不提供动态类加载或运行时安装和插件部署等核心OSGi功能,同时为插件开发提供了更实用的方法。 虽然Spring Plugin并不像OSGi那样强大,但它可以满足穷人构建模块化可扩展应用程序的要求。
假如你希望构建一个可扩展的应用系统,你可能需要从以下几点进行考虑:
- 无论出于何种原因,您都无法将OSGi用作完全成熟的插件架构
- 提供专用的插件接口来满足可扩展性
- 通过简单地提供捆绑在JAR文件中并在类路径中可用的插件接口的实现来扩展核心系统
- 使用Spring来构建应用系统
示例
我们通过一个小示例,来对Spring Plugin系统有一个初步的了解
Spring Plugin提供一个标准的Plugin<S>接口供开发人员继承使用声明自己的插件机制,然后通过@EnablePluginRegistries注解依赖注入到Spring的容器中,Spring容器会为我们自动匹配到插件的所有实现子对象,最终我们在代码中使用时,通过依赖注入注解,注入PluginRegistry<T extends Plugin<S>, S>对象拿到插件实例进行操作。
Plugin<S>接口声明了一个接口实现,标注实现该插件是否支持,因为有可能存在多个接口实现的情况
我们在使用时,可能这样调用:
List<Plugin<S>> plugins=plugin.getPlugins();
S delimiter;
for(Plugin<S> p:plugins){

    if(p.supports(delimiter)){

        p.doSomeThing();//
    }
}
从应用程序的扩展性来说,开发灵活的插件系统是我们每个开发人员都需考虑的
假设目前我们有一个移动电话充值系统,在业务初期发展中,业务的目标是保证稳定性,拥有充值业务
在maven配置中先来引入相关的jar包
<properties>
    <logback.version>1.2.3</logback.version>
    <org.slf4j.version>1.7.21</org.slf4j.version>
</properties>

<dependencies>
    <!-- https://mvnrepository.com/artifact/junit/junit -->
    <dependency>
        <groupId>junit</groupId>
        <artifactId>junit</artifactId>
        <version>4.8.2</version>
        <scope>test</scope>
    </dependency>

    <!-- https://mvnrepository.com/artifact/org.springframework/spring-core -->
    <dependency>
        <groupId>org.springframework</groupId>
        <artifactId>spring-core</artifactId>
        <version>4.0.9.RELEASE</version>
    </dependency>

    <!-- https://mvnrepository.com/artifact/org.springframework.plugin/spring-plugin-core -->
    <dependency>
        <groupId>org.springframework.plugin</groupId>
        <artifactId>spring-plugin-core</artifactId>
        <version>1.2.0.RELEASE</version>
    </dependency>

    <dependency>
        <groupId>org.slf4j</groupId>
        <artifactId>slf4j-api</artifactId>
        <version>${org.slf4j.version}</version>
    </dependency>
    <dependency>
        <groupId>org.slf4j</groupId>
        <artifactId>jcl-over-slf4j</artifactId>
        <version>${org.slf4j.version}</version>
        <scope>runtime</scope>
    </dependency>
    <dependency>
        <groupId>ch.qos.logback</groupId>
        <artifactId>logback-classic</artifactId>
        <version>${logback.version}</version>
        <exclusions>
            <exclusion>
                <groupId>javax.mail</groupId>
                <artifactId>mail</artifactId>
            </exclusion>
            <exclusion>
                <groupId>javax.jms</groupId>
                <artifactId>jms</artifactId>
            </exclusion>
            <exclusion>
                <groupId>com.sun.jdmk</groupId>
                <artifactId>jmxtools</artifactId>
            </exclusion>
            <exclusion>
                <groupId>com.sun.jmx</groupId>
                <artifactId>jmxri</artifactId>
            </exclusion>
        </exclusions>
        <scope>runtime</scope>
    </dependency>
</dependencies>
先来看我们的客户属性:
MobileCustomer
/*** * * @since:spring-plugin-demo 1.0 * @author <a href="mailto:xiaoymin@foxmail.com">xiaoymin@foxmail.com</a> * 2019/05/22 14:41 */
public class MobileCustomer {


    /*** * 电话号码 */
    private String tel;
 	//setter getter
    /*** * 是否老用户 */
    private boolean old=false;
}
声明我们的充值接口:
/*** * 我们有电话增值业务,业务中有充值方法 * @since:spring-plugin-demo 1.0 * @author <a href="mailto:xiaoymin@foxmail.com">xiaoymin@foxmail.com</a> * 2019/05/22 14:42 */
public interface MobileIncrementBusiness{


    /*** * 电话充值 * @param mobileCustomer * @param money 金额 */
    void increment(MobileCustomer mobileCustomer, int money);
}
充值接口目前有一个接口,充值,根据客户和充值金额进行充值的方法
接下来,我们来实现充值的业务逻辑,假设当前我们叫他V1版本
/*** * 第一版本的充值系统 * @since:spring-plugin-demo 1.0 * @author <a href="mailto:xiaoymin@foxmail.com">xiaoymin@foxmail.com</a> * 2019/05/22 14:44 */
public class MobileIncrementV1 implements MobileIncrementBusiness {


    Logger logger= LoggerFactory.getLogger(MobileIncrementV1.class);

    @Override
    public void increment(MobileCustomer mobileCustomer, int money) {

        logger.info("给{}充值电话费,充值金额:{}",mobileCustomer.getTel(),money);
        logger.info("充值完成.");
    }
}
此时,我们在系统中加入充值插件的配置
@Configuration
public class MobileConfig {


    @Bean
    public MobileIncrementV1 mobileIncrementV1(){

        return new MobileIncrementV1();
    }
}
我们在通过对外提供一个业务Service,来调用我们的充值方法
/*** * * @since:spring-plugin-demo 1.0 * @author <a href="mailto:xiaoymin@foxmail.com">xiaoymin@foxmail.com</a> * 2019/05/22 15:00 */
@Component
public class CustomerService {


    @Autowired
    MobileIncrementV1 mobileIncrementV1;

    public void increments(MobileCustomer mobileCustomer,int money){

        //对人员进行充值
        mobileIncrementV1.increment(mobileCustomer,money);
    }

}
通过CustomerService方法,就可以调用我们的充值插件进行话费的充值
我们来模拟
public class MobileTest {


    public static void main(String[] args) {

        AnnotationConfigApplicationContext context=
                new AnnotationConfigApplicationContext("com.xiaominfo.cloud.plugin.phone");

        CustomerService customerService=context.getBean(CustomerService.class);
        MobileCustomer mobileCustomer=new MobileCustomer("13567662664");
        mobileCustomer.setOld(true);
        customerService.increments(mobileCustomer,120);
    }
}
我们对电话13567662664进行充值120元
控制台输出:
2019-05-22 15:11:21,391 INFO (MobileIncrementV1.java:27)- 给13567662664充值电话费,充值金额:120
2019-05-22 15:11:21,394 INFO (MobileIncrementV1.java:28)- 充值完成.
插件的使用到这里就完成了,此时我们或许会有疑问?不是说满足应用程序的可扩展性吗?此处并未体现出来啊?
假设随着电话公司的业务逐步扩大,此时,电话公司推出了老用户充话费折扣的活动,具体的规则是
- 当前电话号码必须是老用户(通过old字段来区分)
- 充值金额必须>100
- 折扣金额为充值金额*10%,返冲到客户的手机上
此时,针对该活动,我们为了满足以上业务,传统的做法是继续在MobileIncrementV1代码中添加业务逻辑
代码会是这样:
public class MobileIncrementV1 implements MobileIncrementBusiness {


    Logger logger= LoggerFactory.getLogger(MobileIncrementV1.class);

    @Override
    public void increment(MobileCustomer mobileCustomer, int money) {

        logger.info("给{}充值电话费,充值金额:{}",mobileCustomer.getTel(),money);
        logger.info("充值完成.");
        if (mobileCustomer.isOld()){

            logger.info("老用户折扣");
            if (money>100){

                BigDecimal big=new BigDecimal(money).multiply(new BigDecimal(0.1));
                logger.info("当前充值金额>100元,返冲{}元",big.intValue());
            }
        }
    }

    @Override
    public boolean supports(MobileCustomer delimiter) {

        return true;
    }
}
改版后的业务逻辑,我们在V1中添加了业务逻辑,满足老客户是进行返冲
运行后,控制台:
2019-05-22 15:24:50,229 INFO (MobileIncrementV1.java:29)- 给13567662664充值电话费,充值金额:120
2019-05-22 15:24:50,231 INFO (MobileIncrementV1.java:30)- 充值完成.
2019-05-22 15:24:50,232 INFO (MobileIncrementV1.java:32)- 老用户折扣
2019-05-22 15:24:50,236 INFO (MobileIncrementV1.java:35)- 当前充值金额>100元,返冲12元
程序没有任何问题,同时也满足了活动要求,但是这样做的缺陷也是明显的,主要如下
- 在V1充值系统中,业务已经稳定,此时,如果我们的返冲活动业务比较复杂的情况下,会出现测试不到的情况,新业务逻辑代码更新后,对非老用户的充值稳定性存在影响
- 如果我们的业务规则变化越来越多,此时我们的V1中的business方法会越来越臃肿,不利于维护
- 假如我们的活动是有时效性的情况下,在某一段时间,这段业务逻辑有空,而时效性失效后,这段业务逻辑是冗余的,但是它仍然存在于我们的主业务方法中.
那么,针对以上问题,我们应该如何解决呢?
Spring Plugin帮助我们解决了此问题,如果用Plugin的方式,我们应该如何做呢?
首先,改进我们的增值业务MobileIncrementBusiness,改业务接口继承Plugin<S>,代码如下:
public interface MobileIncrementBusiness extends Plugin<MobileCustomer>{


    /*** * 电话充值 * @param mobileCustomer * @param money 金额 */
    void increment(MobileCustomer mobileCustomer, int money);
}
我们继承了Plugin的接口,所以我们的子类充值V1业务代码也需要实现Plugin的supports方法,代码如下:
public class MobileIncrementV1 implements MobileIncrementBusiness {


    Logger logger= LoggerFactory.getLogger(MobileIncrementV1.class);

    @Override
    public void increment(MobileCustomer mobileCustomer, int money) {

        logger.info("给{}充值电话费,充值金额:{}",mobileCustomer.getTel(),money);
        logger.info("充值完成.");
    }

    @Override
    public boolean supports(MobileCustomer delimiter) {

        return true;
    }
}
此时,我们把老用户返冲的代码移除了,我们通过Plugin的方式来帮助我们
我们新建老用户返冲的业务实现MobileIncrementDiscount:
public class MobileIncrementDiscount implements MobileIncrementBusiness {

    Logger logger= LoggerFactory.getLogger(MobileIncrementDiscount.class);
    @Override
    public void increment(MobileCustomer mobileCustomer, int money) {

        if (supports(mobileCustomer)){

            logger.info("老用户折扣");
            if (money>100){

                if (money>100){

                    BigDecimal big=new BigDecimal(money).multiply(new BigDecimal(0.1));
                    logger.info("当前充值金额>100元,返冲{}元",big.intValue());
                }
            }
        }
    }

    /*** * 来用户才满足 * @param delimiter * @return */
    @Override
    public boolean supports(MobileCustomer delimiter) {

        return delimiter.isOld();
    }
}
此时,我们启用Plugin插件系统,将我们的返冲实现业务注入到系统中
@Configuration
@EnablePluginRegistries({
   MobileIncrementBusiness.class})
public class MobileConfig {


    @Bean
    public MobileIncrementV1 mobileIncrementV1(){

        return new MobileIncrementV1();
    }

   @Bean
    public MobileIncrementDiscount mobileIncrementDiscount(){

        return new MobileIncrementDiscount();
    }
}
最后,我们修改我们的CustomerService中的充值方法
@Component
public class CustomerService {


    @Autowired
    private PluginRegistry<MobileIncrementBusiness,MobileCustomer> mobileCustomerPluginRegistry;


    public void increments(MobileCustomer mobileCustomer,int money){

        //获取插件
        List<MobileIncrementBusiness> plugins=mobileCustomerPluginRegistry.getPlugins();
        for (MobileIncrementBusiness incrementBusiness:plugins){

            //对人员进行充值
            incrementBusiness.increment(mobileCustomer,money);
        }
    }

}
此时,我们在来运行我们的Test测试
AnnotationConfigApplicationContext context=new AnnotationConfigApplicationContext("com.xiaominfo.cloud.plugin.phone");

CustomerService customerService=context.getBean(CustomerService.class);
MobileCustomer mobileCustomer=new MobileCustomer("13567662664");
mobileCustomer.setOld(true);
customerService.increments(mobileCustomer,120);
控制台输出:
2019-05-22 15:42:01,743 INFO (MobileIncrementV1.java:29)- 给13567662664充值电话费,充值金额:120
2019-05-22 15:42:01,745 INFO (MobileIncrementV1.java:30)- 充值完成.
2019-05-22 15:42:01,746 INFO (MobileIncrementDiscount.java:28)- 老用户折扣
2019-05-22 15:42:01,752 INFO (MobileIncrementDiscount.java:32)- 当前充值金额>100元,返冲12元
通过控制台,我们发现,和在v1业务中继续新增代码的方式,效果是完全相同的,但是对于整个系统的扩展性来说,是V1方式无法比例的,主要体现在以下几个方面:
- 通过插件的方式,不需要更改原来已经稳定的业务代码,对系统稳定性来说尤为重要(系统稳定是基础)
- 与业务解耦,如果业务发生变化(在某个周期内),或者有新用户的活动,我们只需要构建我们的业务代码,核心框架层无需更改
- 程序架构更清晰,分层设计更明显.
源码分析
相信通过上面的示例,我们对Spring Plugin插件技术组件有一个初步的了解,接下来我们看看Spring Plugin的源码实现
既然是号称世界上规模最小的插件系统,通过我们的使用来看,确实也够简单,所以Spring Plugin的代码量也是很精悍.
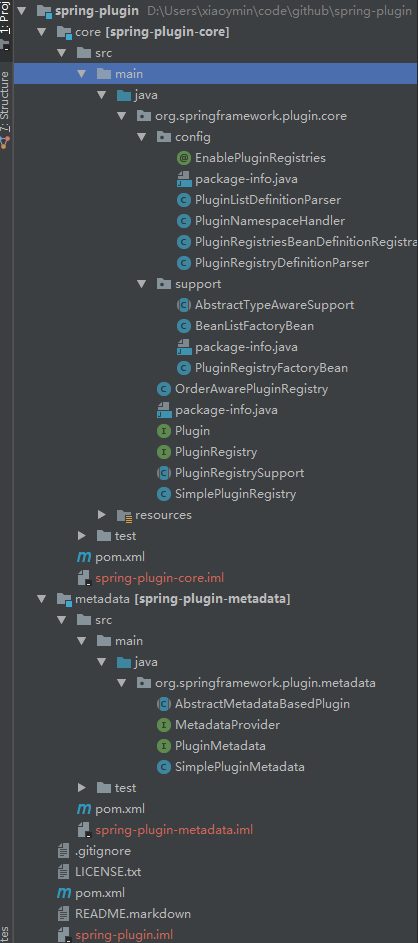
通过GitHub下载下来的源码,总共也就三个包
这对于我们学习他的源码、设计模式来说,反而是好事情.
先来看Plugin涉及到的关键类图:
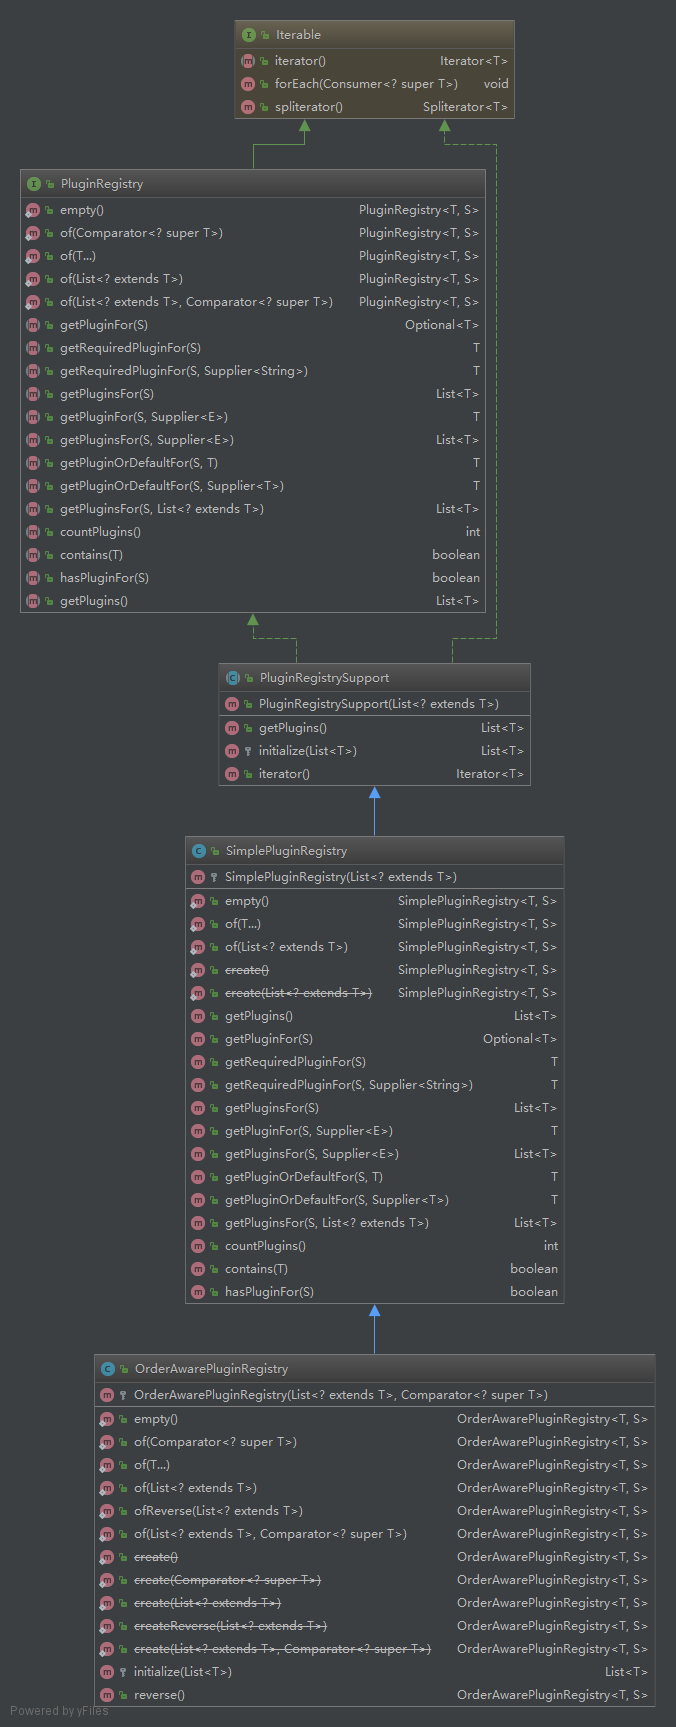
我们最终使用插件时,通过PluginRegistry来获取已实现的插件bean实例,该插件提供了几个主要方法:
- Optional getPluginFor(S delimiter):根据特定条件获取插件的Optional对象(第一个)
- T getRequiredPluginFor(S delimiter):根据条件获取插件对象,如果没有,则抛出异常
- getPlugins():获取所有插件
- contains(T):是否包含插件
- …
我们在使用Spring Plugin组件的时候,主要有以下几个步骤:
- 在我们的Configuration配置类上通过注解
@EnablePluginRegistries注入相应的Plugin接口的class - 在Configuration配置类中注入Plugin的实现类实体Bean
- 通过
@Autowired注解,并使用PluginRegistry<T extend Plugin<S>,S>的方式拿到我们的plugin实例,然后再业务方法中进行使用.
这里有两个关键点:
1、@EnablePluginRegistries注解具体的作用
2、PluginRegistry是接口,通过@Antowired注入,具体的实现类在哪儿?
带着这两个疑问点,我们先来看@EnablePluginRegistries的代码:
EnablePluginRegistries.java
/** * 为开启使用Plugin插件的类型应用启用PluginRegistry的实例注入 * @see #value() * @author Oliver Gierke */
@Target(ElementType.TYPE)
@Retention(RetentionPolicy.RUNTIME)
@Inherited
@Documented
@Import(PluginRegistriesBeanDefinitionRegistrar.class)
public @interface EnablePluginRegistries {


	/** * * The {@link Plugin} types to register {@link PluginRegistry} instances for. The registries will be named after the * uncapitalized plugin type extended with {@code Registry}. So for a plugin interface {@code SamplePlugin} the * exposed bean name will be {@code samplePluginRegistry}. This can be used on the client side to make sure you get * the right {@link PluginRegistry} injected by using the {@link Qualifier} annotation and referring to that bean * name. If the auto-generated bean name collides with one already in your application you can use the * {@link Qualifier} annotation right at the plugin interface to define a custom name. * * @return */
	Class<? extends Plugin<?>>[] value();
}
通过注释我们得知该注解的作用
- 注册PluginRegistry的实例Bean,并以此命名
- 导入
PluginRegistriesBeanDefinitionRegistrar类进行实例Bean注入
PluginRegistry的注入规则是,首字母变小写,例如SimplePluginRegistry的实例bean,在Spring容器中的beanName为simplePluginRegistry
如果系统的命名和自动生成的名称相冲突,可以使用@Qualifier注解来强制命名匹配以解决此问题
来看PluginRegistriesBeanDefinitionRegistrar.java代码:
/** * {@link ImportBeanDefinitionRegistrar} to register {@link PluginRegistryFactoryBean} instances for type listed in * {@link EnablePluginRegistries}. Picks up {@link Qualifier} annotations used on the plugin interface and forwards them * to the bean definition for the factory. * 为pluginRegistry接口注入动态实例bean对象 * * @author Oliver Gierke */
public class PluginRegistriesBeanDefinitionRegistrar implements ImportBeanDefinitionRegistrar {


	private static final Logger LOG = LoggerFactory.getLogger(PluginRegistriesBeanDefinitionRegistrar.class);

	/* * importingClassMetadata:此参数为通过@EnablePluginRegistries注解标注的类型注解元数据信息对象 * registry:注入bean对象 * */
	@Override
	public void registerBeanDefinitions(AnnotationMetadata importingClassMetadata, BeanDefinitionRegistry registry) {


        //获取当前enablePluginRegistries注解类信息
		Map<String, Object> annotationAttributes = importingClassMetadata
				.getAnnotationAttributes(EnablePluginRegistries.class.getName());
		//判断是否为空
		if (annotationAttributes == null) {

			LOG.info("No EnablePluginRegistries annotation found on type {}!", importingClassMetadata.getClassName());
			return;
		}
		//获取什么的类型集合
        //例如我们在示例中使用的@EnablePluginRegistries({MobileIncrementBusiness.class})
        //此处会拿到MobileIncrementBusiness.class这个type,types.length=1
		Class<?>[] types = (Class<?>[]) annotationAttributes.get("value");
        //循环遍历
		for (Class<?> type : types) {

            //获取PluginRegistryFactoryBean类的实体bean定义builder
			BeanDefinitionBuilder builder = BeanDefinitionBuilder.rootBeanDefinition(PluginRegistryFactoryBean.class);
			builder.addPropertyValue("type", type);

			RootBeanDefinition beanDefinition = (RootBeanDefinition) builder.getBeanDefinition();
			beanDefinition.setTargetType(getTargetType(type));

			Qualifier annotation = type.getAnnotation(Qualifier.class);

			// If the plugin interface has a Qualifier annotation, propagate that to the bean definition of the registry
			if (annotation != null) {

				AutowireCandidateQualifier qualifierMetadata = new AutowireCandidateQualifier(Qualifier.class);
				qualifierMetadata.setAttribute(AutowireCandidateQualifier.VALUE_KEY, annotation.value());
				beanDefinition.addQualifier(qualifierMetadata);
			}
			//获取bean的默认名称
			// Default
			String beanName = annotation == null //
					? StringUtils.uncapitalize(type.getSimpleName() + "Registry") //
					: annotation.value();
			//动态注入
			registry.registerBeanDefinition(beanName, builder.getBeanDefinition());
		}
	}

	/** * Returns the target type of the {@link PluginRegistry} for the given plugin type. * * @param pluginType must not be {@literal null}. * @return */
	private static ResolvableType getTargetType(Class<?> pluginClass) {


		Assert.notNull(pluginClass, "Plugin type must not be null!");

		ResolvableType delimiterType = ResolvableType.forClass(Plugin.class, pluginClass).getGeneric(0);
		ResolvableType pluginType = ResolvableType.forClass(pluginClass);

		return ResolvableType.forClassWithGenerics(OrderAwarePluginRegistry.class, pluginType, delimiterType);
	}
}
通过以上代码,我们知道:
- 通过
@EnablePluginRegistries会为我们动态注入PluginRetry的实体bean PluginRegistryFactoryBean会产生一个目标bean的代理,此目标bean真是PluginRegistry接口的实例,首先找到容器中实现了Plugin插件接口的实体bean,最终得到一个List<Plugin>的集合- 通过拿到该Plugins的结合,在通过
OrderAwarePluginRegistry.create(List<Plugin<S>>)的方法来创建PluginRetry接口的默认实例 - 通过上面的类图其实我们知道,PluginRetry的接口拥有他的默认子类实现,为OrderAwarePluginRegistry
回过头来看我们示例中的CustomerService的Plugin调用方式
@Component
public class CustomerService {


    @Autowired
    private PluginRegistry<MobileIncrementBusiness,MobileCustomer> mobileCustomerPluginRegistry;
}
通过制定泛型T和delimiter的S,最终通过依赖注入匹配到PluginRegistry的实例bean
我们可以通过调试来查看我们最终的mobileCustomerPluginRegistry是否和我们通过读源码的方式得到的一致:
我们通过Debug断点来跟踪
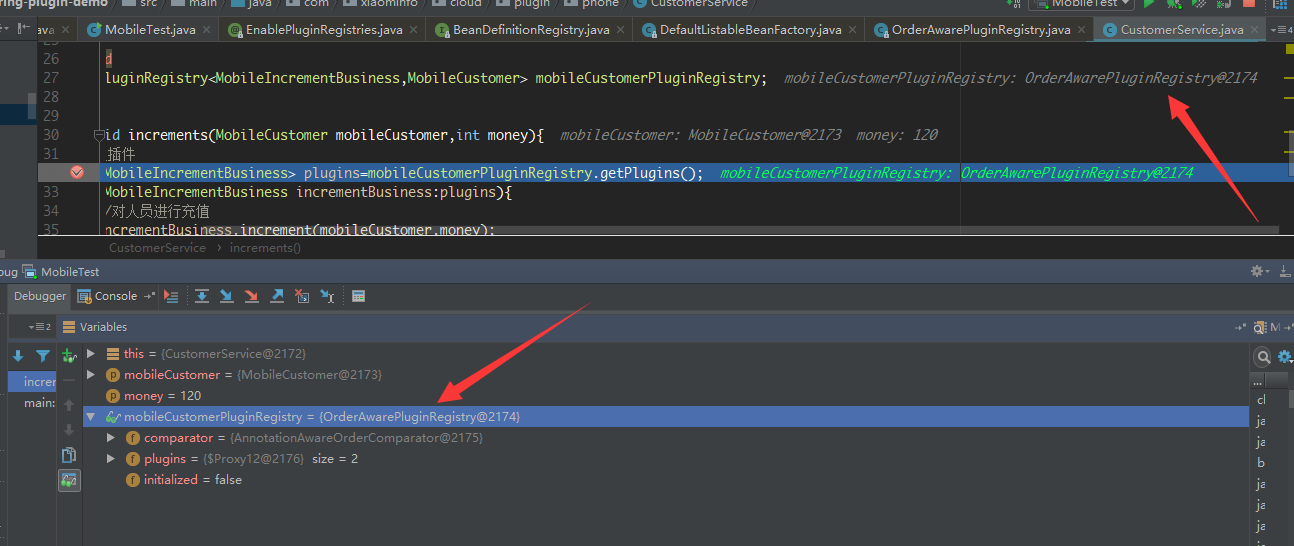
从上图中我们可以看到,PluginRegistry的最终实例是OrderAwarePluginRegistry实体对象
整个过程也到此结束
总结
我们通过该篇文章的分析,了解到了Spring Plugin组件的工作方式,大致跟踪学习了Plugin的初始化过程
不知道通过上面的介绍,你是否会在工作中更多的使用Spring Plugin组件的,至少从目前来看,他的使用还是很简单的,对于应用程序的可扩展性也是极强的.
Springfox的源码中大量的使用了Spring Plugin的这种方式,相信通过这篇文章,能对后面我们研究学习Springfox的源码有一个很大的提升和帮助.